Model Deployment (K8s and EKS)
In this article, I’ll explore how to deploy an existing Keras model to AWS-EKS using TensorFlow Serving and Kubernetes. TensorFlow Serving is a flexible and high-performance system for serving machine learning models, and Kubernetes is an open-source container orchestration system that automates the deployment, scaling, and management of containerized applications.
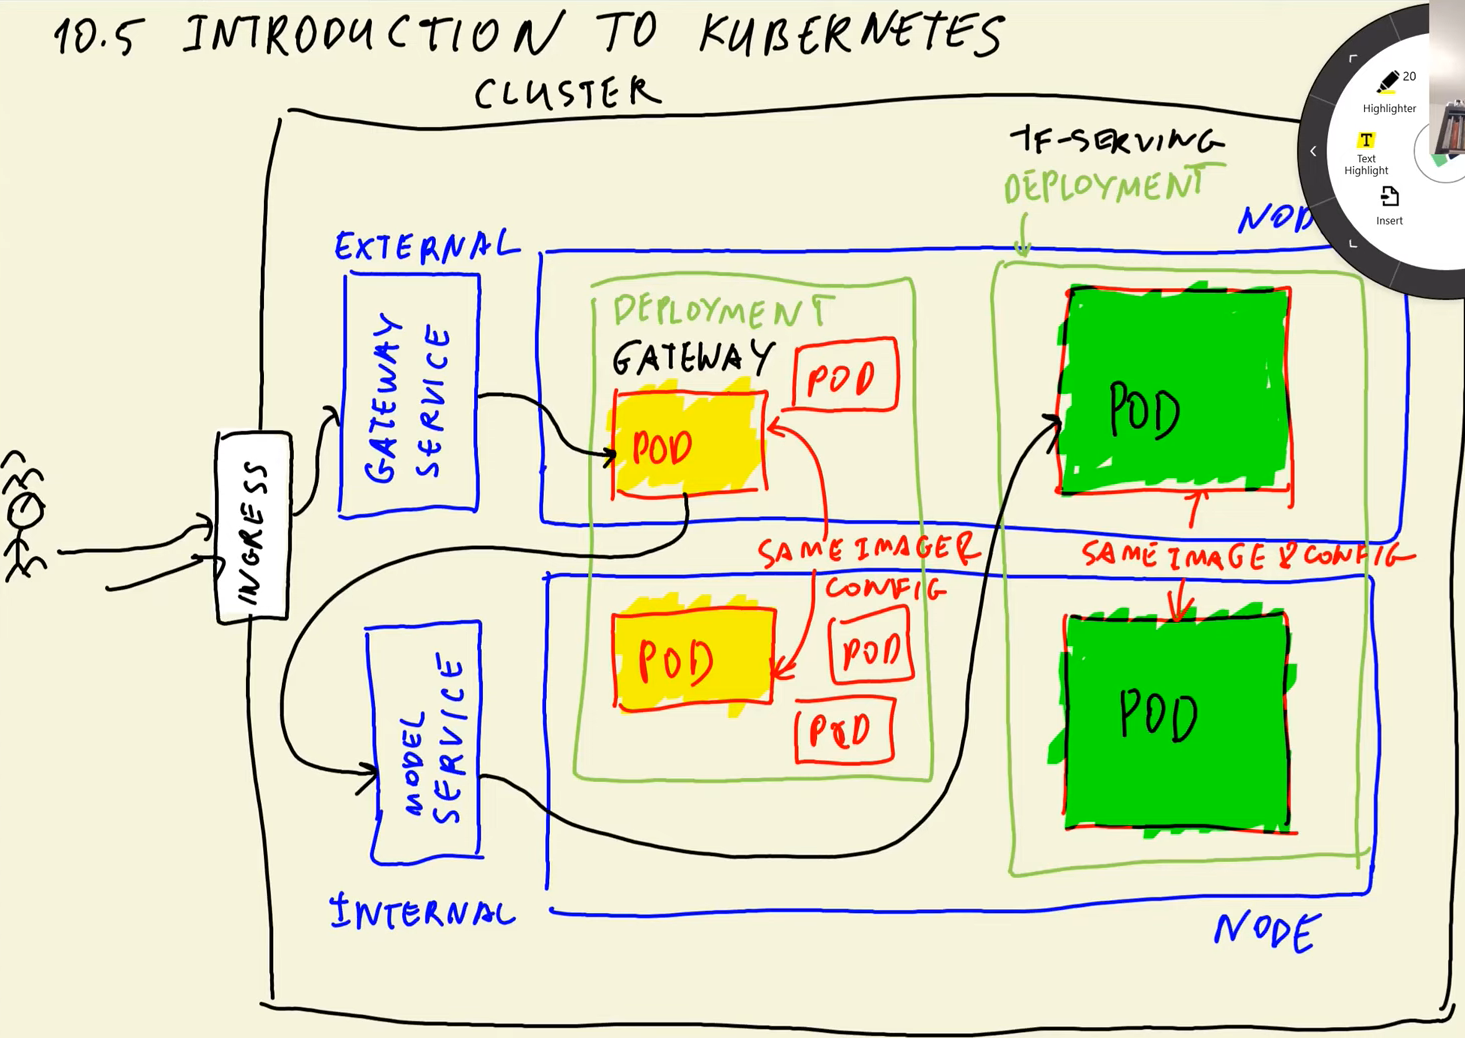
To deploy a Keras model to AWS-EKS, we will first need to package the model using TensorFlow Serving. We will then create a Kubernetes deployment that includes a container running the TensorFlow Serving image, which will serve our model. The diagram below illustrates the architecture of the deployment, with the yellow circles indicating the components that will be deployed to Kubernetes.
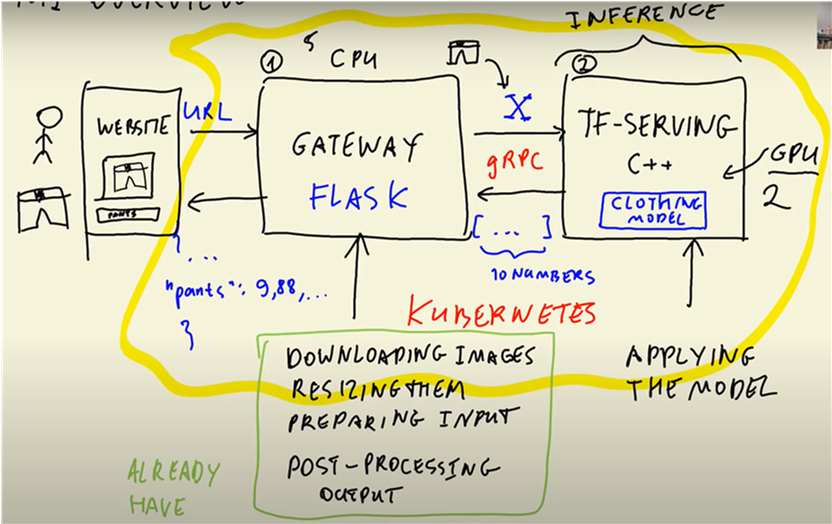
In this project, we have two key components:
-
Gateway, which downloads images, resizes them, and turns them into a numpy array. This is computationally inexpensive and can be done using a CPU.
-
Model, which involves matrix multiplications that are computationally expensive. Therefore, we might need to use GPUs to handle this component.
The advantage of this setup is that the two components can be scaled independently. For example, we may need five gateway instances but only two instances of TF Serving with high-performance GPUs to handle the computationally expensive model component.
TensorFlow Serving
TensorFlow Serving is an open-source platform for serving machine learning models. It provides a flexible, high-performance serving system for deploying TensorFlow models in production environments. With TensorFlow Serving, you can quickly deploy new models and run experiments while maintaining the same server architecture and APIs. It provides a gRPC interface for clients to send prediction requests and receive responses.
First, convert the existing Keras model.
# convert.py
import tensorflow as tf
from tensorflow import keras
model = keras.models.load_model('./clothing-model.h5')
# Convert the model to TF format
tf.saved_model.save(model,'clothing-model')
Containerization
Next, we need to containerize the model and gateway, and create separate Docker images for each. To enable communication between the gateway and model containers, we can use docker-compose.
#image-model.dockerfile
FROM tensorflow/serving:2.7.0

COPY clothing-model /models/clothing-model/1
ENV MODEL_NAME="clothing-model"
#image-gateway.dockerfile
FROM python:3.8.12-slim

RUN pip install pipenv
WORKDIR /app
COPY ["Pipfile", "Pipfile.lock", "./"]
RUN pipenv install --system --deploy
COPY ["gateway.py", "proto.py", "./"]
EXPOSE 9696
ENTRYPOINT ["gunicorn", "--bind=0.0.0.0:9696", "gateway:app"]
Kubernetes (K8s)
 Source: kubernetes.io
Kubernetes is an open-source platform for automating the deployment, scaling, and management of containerized applications. It provides a unified API for deploying and managing containers, and it can run on a variety of cloud platforms and on-premise servers. With Kubernetes, you can automate the deployment and scaling of your applications, and ensure that your services are always available and up-to-date.
Here are the key components and features of Kubernetes:
-
Nodes: Nodes are the worker machines in a Kubernetes cluster, where the applications and services are deployed. Nodes can be physical machines or virtual machines running in a cloud environment.
-
Pods: Pods are the smallest and simplest unit in the Kubernetes object model. They contain one or more containers, and all containers in a pod share the same network namespace, making it possible for them to communicate with each other using localhost. The pod runs on a node.
-
Services: The entry point of an application and route requests to pods. Services are abstractions that define a set of pods and provide a stable IP address and DNS name to access them. Services also provide load balancing and support for rolling updates, making it easy to deploy new versions of an application.
-
Deployments: A Deployment is a higher-level object in Kubernetes that manages a set of replicas of a pod. The Deployment provides a declarative way to manage the desired state of a set of pods, and ensures that the desired number of replicas are always running and available.
-
Horizontal Pod Autoscaling (HPA) is a Kubernetes feature that allows you to automatically scale the number of replicas of a pod based on CPU utilization, memory utilization, or custom metrics. This helps to ensure that your application can handle varying levels of traffic and demand without manual intervention.
-
In Kubernetes, an Ingress is an API object which is a powerful and flexible way to manage external HTTP(S) traffic to your internal services in the cluster, allowing you to easily expose and route traffic to your services while maintaining control over security and routing policies. (External = Load Balancer, Internal = Cluster IP)
Before we start, we need to install Kubectl and Kind.
-
kubectl: kubectl is the command-line tool for interacting with a Kubernetes cluster. With kubectl, you can perform a variety of tasks, such as creating and managing resources, accessing logs and status information, and debugging applications. kubectl is a versatile and powerful tool that is an essential part of working with Kubernetes.
-
kind: kind is a tool for running Kubernetes clusters on local development machines. kind makes it easy to spin up a fully-functional Kubernetes cluster on your own machine, which is useful for testing and development purposes. With kind, you can experiment with different configurations, test new features, and debug issues without having to rely on a remote cluster.’
Deploying TensorFlow Models to Kubernetes
-Model-
# load a Docker image into a Kind cluster.
$ kind load docker-image zoomcamp-10-model:xception-v4-001
# list the pods in a Kubernetes cluster.
$ kubectl get pod
$ kubectl apply -f kube-config/model-deployment.yaml
$ kubectl port-forward tf-serving-clothing-model-548c6-fd5n8 8500:8500

# apply a configuration file to a Kubernetes cluster
$ kubectl apply -f kube-config/model-service.yaml
# forward traffic from a local machine to a service in a Kubernetes cluster
$ kubectl port-forward service/tf-serving-clothing-model 8500:8500
-Gateway-
$ kind load docker-image zoomcamp-10-gateway:001
$ kubectl apply -f kube-config/gateway-deployment.yaml
$ kubectl port-forward gateway-7d467-r8dkc 9696:9696
# need to add 'type: LoadBalancer' in gateway-service.yaml
$ kubectl apply -f kube-config/gateway-service.yaml
$ kubectl port-forward service/gateway 8080:80
Deploying to EKS
# eks-config.yaml
apiVersion: eksctl.io/v1alpha5
kind: ClusterConfig

metadata:
  name: mlzoomcamp-eks
  region: eu-west-1

nodeGroups:
  - name: ng-m5-xlarge
    instanceType: m5.xlarge
    desiredCapacity: 1
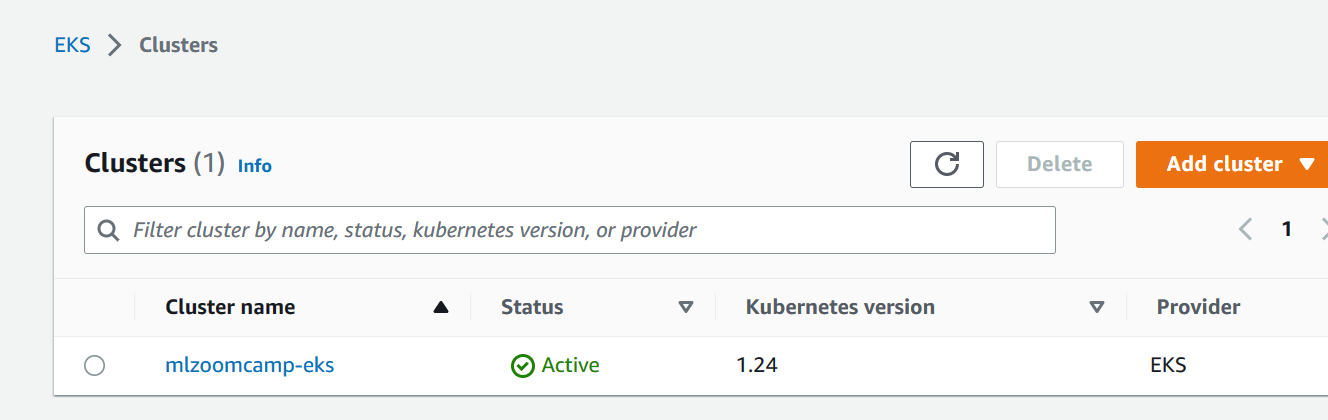
# create an Amazon EKS cluster
$ eksctl create cluster -f eks-config.yaml
# create an Elastic Container Registry (ECR) repository for doecker images
$ aws ecr create-repository --repository-name mlzoomcamp-images 用
After running this line of code, you will see the “repositoryUri”.

Send a request through the following code.
# testing.py
import requests
url='4290xxxxx.ap-northeast-1.elb.amazonaws.com/predict/'
data = {'url','http://bit.ly/mlbookcamp-pants'}
result=requests.post(url,json=data).json()
print(result)
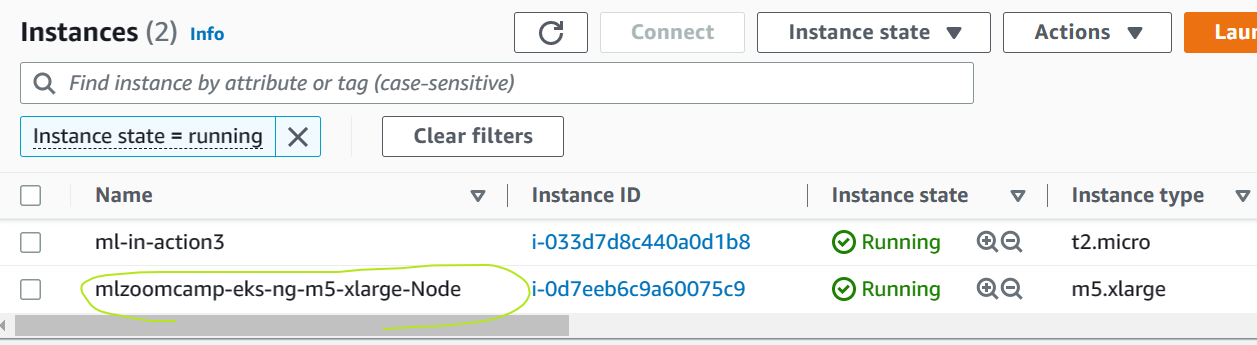
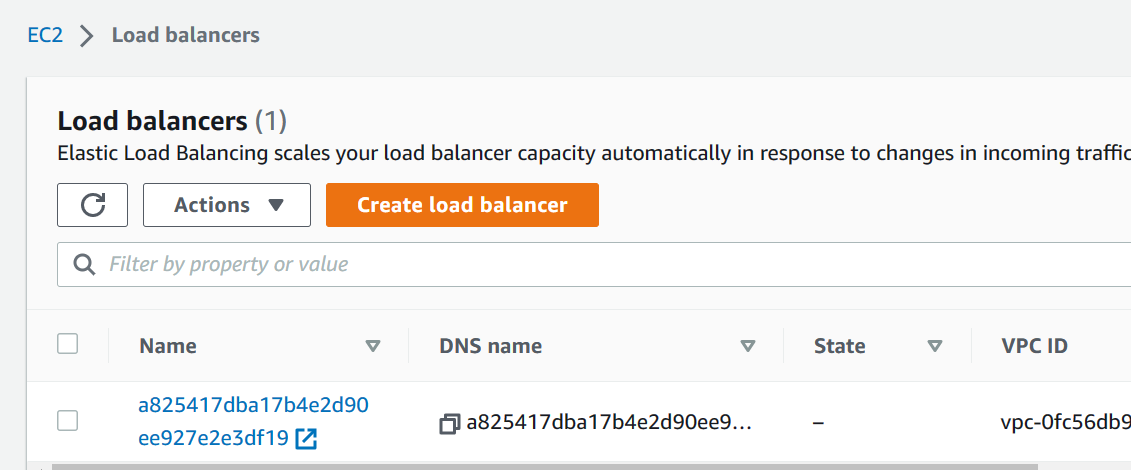
We can see the newly added cluster in EKS; besides, you can also find the added NODE in EC2, as well as the Load Balancer.